
Recall is one of the advanced and most useful modules in Dentalore Cloud system in which the main purpose of Recall module is to help the user to track and recall his patients in clinic upon specific period of time, visits, and procedures that all could be managed from the Settings module.
When a recall is created for any patient, it will be listed in the Recall List view.
To Access Recall List View, Follow the following:
- Select Recall Module. Directly the Recall List View page opens.

- Recall List View is mainly divided in 2 sections: (Search Area) and (Grid View).

1- Search Area
User is able to search by the following data:
- Due Date: Filter recall list by recall due date, Is a drop down menu that contains all of the defined date ranges in Dentalore System that could be: (All, Tomorrow, Today, Yesterday, Current Week, Last Week, Current Month, Last Month, Current Year, Last Year, or Custom Range). Default selection of due date is: Current Month.
- Recall Type: Is an Auto-Complete drop down menu contains the 2 defined types of recall (Appointment and Progress notes) in order to filter data by required recall type. Default selection is: Blank which means that data of both recall types displayed in grid view.
- Patient: Is an Auto-Complete drop down menu that contains all of the patients created in the selected branch from navigation bar. Default selection is: Blank which means that all patients that have recall will be displayed in the grid view.
- Provider: Is an Auto-Complete drop down menu that contains all of the providers assigned to the selected branch from navigation bar. Default selection is: Blank which means that all recalls assigned to any provider or not assigned will be displayed in the grid view.
- Status: Is an Auto-Complete drop down menu that contains the 3 available status of recall that could be: (New, Active, or Closed). Default selection is: Blank which means that recalls of all status will be displayed in the grid view.
- "Filter" button: Once pressed, the records in grid view displayed depending on the data selected in the search criteria.
- "Clear" button: Once pressed, Fields of search area are set to it's default values.
2- Recall List Grid View
Grid view displays all of the created Recall Rules depending on the data of filtration in search area. Recall Records displayed with the following:
- Actions Column: 4 Actions are available for each Recall Record which are:
- "View": Icon when pressed, user directed to new page of "Edit Recall". For more details, Check: Edit Recall Page.
- "Delete": Icon when pressed, Popup "Delete Recall" appears to delete the recall record.
- "Phone Call": Icon when pressed, Popup "Phone Call" appears to perform a phone call to the patient.
- "Send Message": Icon when pressed, Popup "Send Message" appears to send a manual message (SMS and/or Email) to the patient.
>> Note that for recalls of status: (Closed), both of the "Phone Call" and "Send Message" actions are disabled that can't be used.
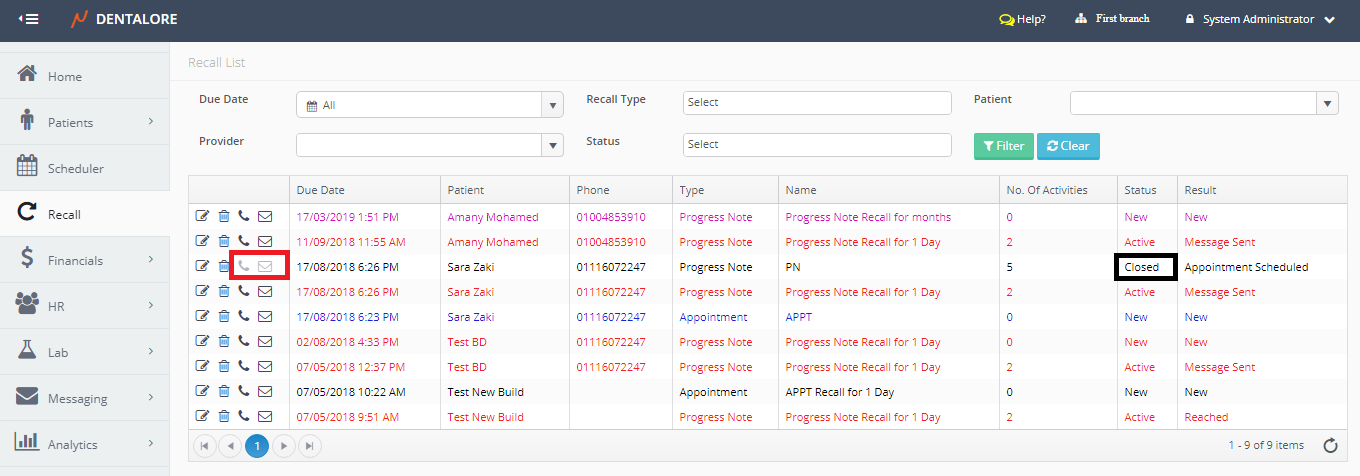
- Due Date: Column that displays the due date of each recall.
- Patient: Column displays the patient's Name.
- Phone: Column displays the patient's Phone Number.
- Type: Column displays the type of recall that could be: (Appointment or Progress Note).
- Name: Column displays the name of recall rule created for patient.
- No. of Activities: Column displays the count of activities performed on the recall record, that means any action performed on the patient's recall increase the count of activities. Theses actions are:
- Phone Calls.
- Manual Messages (SMS and/or Email).
- Automatic Messages (SMS and/or Email). - Status: Column displays the recall's status that could be: (New, Active, or Closed).
>> Note that once an action performed on the recall record; then it's status changed to be: (Active). - Result: Column displays the result depending on the recall's status that each status has different results in which for:
- Status: (New) -> Result is (New).
- Status (Active) -> Result depends on action performed, for example: If action is (Sending Message) then automatically Result will display (Message Sent).
- Status (Closed) -> Result depends on the action that closes the recall, for example when a visit is created for the recall then automatically Result will display (Appointment Scheduled).
>> As well there are more options to select for the (Result) for both the "Active" and "Closed" status, for more information, Check: Edit Recall Page.
Note that the recall records are displayed in different colors that each color refers to different recall rule that could be managed from the Recall's module in settings, for more information Check:
- Configure Recall Rule of "Appointment" Type.
- Configure Recall Rule of "Progress Note" Type.
- Notification is displayed whenever a new recall is added in current month.
- Notification displays Number Recalls with status "New".

Note: Only Recalls of Status ‘New’ display Notification, after you change Recall Status to ‘Closed’ or ‘Active’ the Notification decrements.